Screen recording software is invaluable if you want to make software demos or tutorials. On a Mac, you can use the free QuickTime player to make simple screen recordings. However, its recording capabilities are limited (full screen or rectangular area but no fixed-size presets or selected windows) and there is no editor. So it’s fine for very simple recordings but it’s not suitable for creating good quality screencasts.
On Windows, my favourite screen recording program is TechSmith’s Camtasia. Recently, TechSmith released Camtasia 2 for the Mac and I was keen to see how that compared with the Windows version.
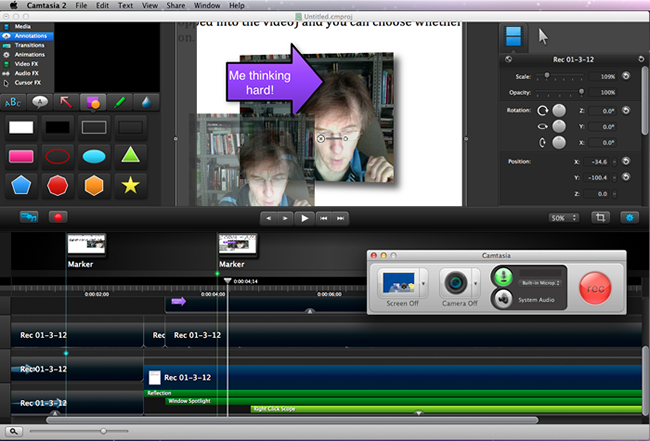
First impressions were good. In common with the Windows version, Camtasia for the Mac is divided into two parts: the recorder and the editor. The recorder takes the form of a small, free-floating panel. Here you can start recording the entire screen or a specific region; you also record from the camera simultaneously with the screen-recorder (if you want to record yourself so that you can add a ‘talking head’ to the screencast as an overlay) and you can choose whether or not to record a narration.
When you are ready to start recording, you click the big red button to begin. If you opted to record a screen area you can now either mark off an arbitrary rectangle or you can select a specific window; the Camtasia recorder will automatically fit itself around a selected window. The recorder puts a button into the Mac’s horizontal menu area so that you can easily pause or stop a recording at any time. You can also stop recording by pressing a hotkey.
When you finish a recording, the recorded clip is automatically loaded into the Camtasia editor. If you recorded from both the camera and the screen, the two recordings are loaded into separate tracks on the timeline. You can then move or resize the camera-recorded video by setting properties or dragging and stretching it. If you recorded a narration, the audio can optionally be extracted into its own track for separate editing.
Timeline editing includes the ability to cut, copy and delete selected portions of tracks. You can also add transitions between tracks to make one fade into the next or zoom or slide into shot. You can add animation effects to make (for example) a camera-recorded video fade or ‘tilt’ (slide at an angle) into view. You can add video effects such as glows, reflections ad drop shadows; and you can add audio effects to adjust the volume or reduce noise.
When affects are added they can be controlled by setting parameters in a panel and they can be restricted to specific areas of the timeline by sizing the coloured bars that appear beneath the track to which they apply. For example, if you want to display the reflection effect under a camera-recorded video for only half of the track, you would drag the ends of the reflection bar to apply the effect only to a specific period. Similarly if you wanted mouse-click effects (visual highlights when a mouse button is clicked), you would resize the mouse effects bar to restrict click-effects to part of the recording.
Curiously there is no integrated audio-narration tool. In Camtasia for Windows you can record the screen action first then simply click a button in the editor to add a narration over the top; the editor positions the audio-recording at a designated point on the timeline. In the Mac version, you have to record a narration using the Camtasia Recorder panel while playing back the screen-recording in the editor. When you’ve finished, the audio track is added into a pane containing media clips and you have to drop it into the timeline and do your best to make it match up with the screen-recording. Frankly, this is a bit clunky.
Other editing features include annotations such as arrows, speech bubbles and notes which can be dropped onto a recording. You can export your video in a number of standard formats including MPEG-4, AVI and QuickTime.
Compared to the Windows version of Camtasia (see my review of Camtasia Studio 7), this is a relatively simple tool. It lacks many of the Windows version’s features such as a menu-maker and quiz generator. And its built-in effects are more limited – for example, it has just six transitions compared with the Windows version’s 25 (though these can be adjusted by setting properties); and while it has some visual mouse-click effects it does not have an audible ‘mouse-click’ generator. So, if you record a narration, you cannot automate the addition of audible mouse clicks as in Camtasia for Windows. In short, the Windows version is a much more complete and mature product. But, on the downside, it’s also more expensive ($299 / £230 inc VAT).
On the plus side, Camtasia for Mac looks nicer – neater and slicker – than the Windows version. And there are many things about the user interface – its property panels, for example, and the adjustable effects bars in the timeline – that I’d like to see migrated to Camtasia Studio for Windows.
One other deficiency of the software is its inability to share projects between the Mac and Windows versions. The project formats are different and incompatible. The recommended way of sharing screen recordings between Mac and Windows is to render them to non-editable videos and then import them as ‘clips’.
In summary, Camtasia for Mac is easy to use and, for most people, most of the time, it probably has all (or most) of the capabilities you are likely to need. Even so, if you are used to the Windows Camtasia, there will almost certainly be features that you will miss.