Pinnacle Studio is a well-established video editing suite for Windows. It was previously made by Avid Technology but which was bought by Corel earlier this year. To a degree, this may seem to compete with Corel’s other video editing suite, Video Studio Pro. Corel tells me that the main distinction between the two products is that Video Studio Pro is predominantly “consumer/beginner focused” whereas Pinnacle Studio is more “professional grade”. This is a review of Pinnacle Studio 16 Ultimate.
While it is certainly possible to make professional-looking videos using Pinnacle Studio, it is not really aiming to take on the big, expensive packages such as Adobe Premiere Pro or Media 100 which may cost in excess of $800. I would say that Pinnacle Studio is aimed more at the “serious amateur” or independent (i.e. “on a budget”) professional rather than high-end commercial video makers. In fact, you might detect a few clues to the target audience from the ‘bonus’ contents provided with the software. This includes pre-designed title graphics which are categorised into named sections such as Baby, Family, Holiday, Performing Kids and Winter Holidays. True there is also a section called Professional. Even so, my general impression is that it is assumed that a large percentage of potential buyers will be editing home and family videos.
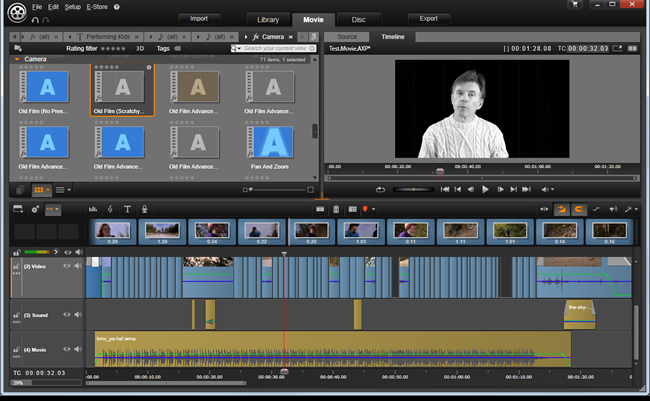
This is the Movie editing environment of Pinnacle Studio 16. At the bottom is the multi-track time-line. Top-left is a view of some effects from the Library. I’ve dropped an ‘old film’ effect onto a clip and I am previewing the result in the window at the top-right.
Overall, the software looks pretty slick with a neat, dark-coloured user interface divided into five main sections – Import, Library, Movie, Disc and Export – each of which is located on a tabbed ‘page’. The Movie tab provides access to the video editing environment, Library is a storage area for clips, the Disc page is where you may create DVD menus, and Import and Export are exactly what their names suggest. You can import from your hard disc, from a non-protected DVD/Blu-ray, from the internet or from a connected device such as a Webcam or video camera. You can export a finished movie in a variety of popular formats such as AVI, Mov, Flash and MPEG. Rendering generally seems pretty speedy.
To make a movie, you just drag your clips onto the tracks in the timeline editor in the Movie environment. This page also gives access to a reduced-size view of the Library so that you can select clips easily. In addition to the timeline, there is also a storyboard in which you can view clips as discreet images with their running times shown in labels.
Once you’ve placed some clips onto the timeline, they can easily be moved and resized (to adjust their duration) by dragging and dropping. If you want to avoid sharp joins between clips you can apply transitions in order to make adjacent clips fade into one another. You can also blend two clips using wipes, ‘fly-ins’ or even really snazzy effects such as multiple video-clip windows or clips that break apart like shattered glass.
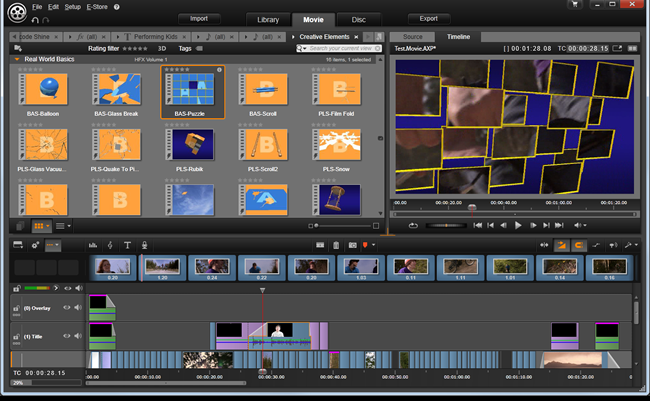
Here I’ve applied a ‘puzzle’ transition to a clip. The previewer shows the clip being ‘assembled’ from squares that fly together.
The truth is there are more transitions in this package than anyone is ever likely to need. To apply a transition you just select it in the Library, drag it onto the join between two clips and then scroll the marked ‘transition area’ on a clip to alter the duration and speed of the transition. For a finer level of control you can also edit the clip and any transitions or effects in a popup editor that lets you alter timings using a dedicated clip-based timeline. This editor lets you adjust individual properties for certain add-ins so that effects can be fine-tuned. There is also a built-in audio-mixer to fade clips in and out or drag and drop the sound ‘position’ to animate the panning of sound between left and right (or front and back) speakers. You can edit Dolby 5.1 sound and, just in case you have Hollywood ambitions, there is also support for 3D video editing.
Pinnacle Studio 16 comes in three editions: the entry-level Studio 16 (£49.95), Studio 16 Plus (£79.95) and Studio 16 Ultimate (£99.95). The most obvious differences between the editions are the restrictions on the number of audio and video tracks possible in a project. The entry-level edition is limited to three tracks, the Plus edition can use up to 12 and the Ultimate supports, in theory, an unlimited number of tracks. There are a few other differences in the features lists too, such as the omissions of Dolby 5.1 sound in the basic edition and the inclusion of enhanced ‘toolkits’ in the Ultimate edition. The full feature list for all editions can be seen in a chart on the Pinnacle Systems web site.
The Ultimate edition, which I’ve been using, comes with a huge range of filters to add colour and ‘camera lens’ effects as well as audio effects such as reverb and echo. In addition, it supplies the Red Giant Filmmaker’s Toolkit and Motion Graphics Toolkit. The Filmmaker’s Toolkit has drop-in effects to automate colour correction and do ‘cosmetic clean-ups’ for HD close-ups; it can smooth out skin tones and wrinkles to make the subject look younger. The Motion Graphics toolkit provides various static and animated lighting and shading effects and it also has other effects such as particles to simulate fireworks and snow.

There is a dedicated editor to let you fine-tune effects and addins as I am doing here by adjusting the parameters of the Hall Of Mirrors effect using the entry boxes and sliders on the right of the editor.
Arguably, the most serious competitor to Pinnacle Studio is Sony’s Movie Studio or Vegas. In the past, all editions of the Sony software carried the Vegas name. With the release of version 12, the less expensive packages have been rebranded as plain ‘Movie Studio’. Probably the Movie Studio Platinum 12 edition (£79.95) is the closest terms of price and functionality to Pinnacle Studio Ultimate (see my review of its predecessor, Vegas Movie Studio HD Platinum 11).
I must admit that sheer familiarity with Vegas Movie Studio tends to prejudiced me in favour of the Sony product. However, if I were using these two products without any previous experience, I am not at all certain that the Sony suite would be the clear winner. In many respects, I think Pinnacle Studio is easier to use, especially for a novice user. It also benefits from some excellent video tutorials supplied as standard. So, even though I will probably stick with the Sony package for my day-to-day editing, I would have to concede that Pinnacle Studio 16 is a very attractive alternative. It scores well on its simple interface, and it also comes with an impressive range of add-ins and effects. The best way to make up your mind is to try it out. Both Pinnacle Studio and Sony Movie Studio are available as time-limited free trials that can be downloaded from the manufacturers’ web sites.
Overall, Pinnacle Studio 16 Ultimate is a very nice, easy-to-use video editing suite that effectively bridges the gap between low-cost hobbyist software and high-cost professional products.