- Right-click to download the source code
See also the final part of this series
But there are circumstances where this sort of behaviour makes life simpler. Take my esteemed colleague, Wilf Hey, for example. Some time ago now, Wilf started messing about with rockets - water powered rockets at that. These devices are not things to be taken lightly - there’s a serious danger of getting wet. For a strict theoretician like myself, this is taking applied science too far.
Anyway, I decided that rocketry was best done from an armchair (well, keyboard) and set about trying to emulate Mr Hey - without getting wet. The traditional way of doing theoretical rocketry is to hire a rocket scientist and get him or her to model the rocket’s flight. This involves deriving and then solving the equations that describe the movement of the rocket. In general, it’s a good idea to do this modelling before building the real thing. Experimenting on real rockets is an expensive business.
The problem with this is that setting up the equations can require a good few years training in maths and physics. Solving them often needs numerical analysis on very fast computers. This is because the variables that control the rocket’s motion are connected via complicated ’differential’ equations. These describe the flight of the rocket in exact detail from the moment it lifts off to the point at which it lands or crashes. Given the solution to the differential equations, you can look up a table or a graph and determine exactly where the rocket will be at a specific time. If your rocket happens to cost upwards of a hundred million dollars - and you are sitting on top of it at the time - this can be very comforting.
But there’s another way of looking at things - and that’s from the rocket’s point of view. The rocket doesn’t have the necessary years of mathematical training to solve differential equations. All it knows about are one or two things at any one time - like the force of gravity and the thrust and direction of its engine. I’ll look at things from the rocket’s point of view.
Throwing rocks
The first thing we’ll do is build a simple ’ballistic’ rocket. The rocket is given an initial shove and then coasts under gravity - similar to throwing a rock, in fact. And while simple, this illustrates the major features of how our ’rocket’ will work.
The rocket control, Rocket.ctl, has a public method, Tick. Calling this will cause the rocket to move its position in response to the laws of physics. First, the horizontal position is increased by the product of the horizontal velocity (speed) and the time interval between two ’ticks’. We’ll assume each tick to be one second to make things simple.
Extender.Left = Extender.Left + vh
As I described previously, you have to use the Extender object to access the container’s coordinate system. The vertical position is a little (but not much) more complicated. We have to take into account the effect of gravity slowing down the initial vertical speed of the rocket:
  Extender.Top = Extender.Top - vv

  vv = vv – g
Next, we need a check to ensure that our rocket doesn’t turn into a tunnelling machine and stops when it hits the ground, so before updating the rocket’s position as above, there is a test:
If Extender.Container.Ground.Y1 >= Extender.Top + Height Then

…
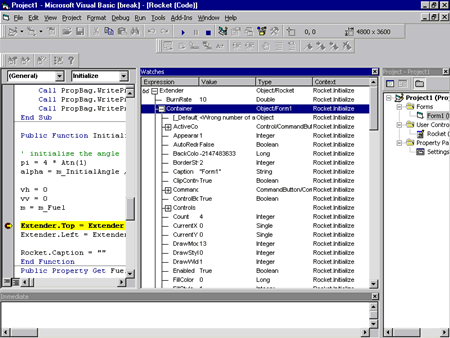
This needs a little explanation. I’ve drawn a horizontal line called Ground in the container form, Form1, to represent the ground. The Ground object is a member of the container, Form1, and can be accessed from a control by using the Extender object. The way you do this is to use the Container part of the Extender object. You can see this more clearly by running the program, putting a breakpoint at this line and using the Watch window to examine the Extender object (see screenshot). I’ve also allowed for the height of the rocket control as well.

You can set the Rocket’s properties by using a property page. If you display Form1 and select the Rocket object then choose View | Property Pages, you’ll see the Rocket’s property page. You can set the initial angle of the Rocket’s trajectory and its speed.
There’s one other small point. The Tick code contains a DoEvents command. This lets Visual Basic examine its message queue and process any events that it finds there. Because the Rocket control has moved, there will be a message in the queue requesting Form1 to repaint the bits that have been left uncovered by the movement of the control. It’s quite instructive to comment this out and run the program again to see the effect of not calling DoEvents. See Rocket1 in the program source for the code.
Timers
In the first example, I used a simple loop to ’step’ the Rocket control. This works, but isn’t really in keeping with the notion of a Newtonian ’clockwork’ universe where everything continues on its preordained path once the initial creation event has occurred. It’s not good programming practice either: the Start button should start things up, not keep everything going.
In the second example, Rocket2, I’ve introduced a timer to handle the ticking of time. Incidentally, this is why the Rocket’s work is done in a routine called Tick - it corresponds to the ticking of universal time. There are two other advantages to using a timer to drive the Rocket. First, you can set the timer interval to display the progress of the Rocket as you wish: a small timer interval will produce a smoother movement, while a larger interval will let you examine the individual Rocket ’steps’. Secondly, you don’t need the DoEvents command since, once the timer has fired, control is returned to Visual Basic which will then examine its message queue and redraw the screen as required.

To infinity and beyond!
The first two examples describe not what could be called a rocket, but more like a rock. All that happens is that the rocket follows the trajectory determined by its initial conditions. A real rocket has a payload - astronauts or a satellite - and a supply of fuel, which at some point will run out. The third example, Rocket3, adds a payload and a variable amount of fuel. You can also alter the rocket’s thrust by changing the exhaust velocity.
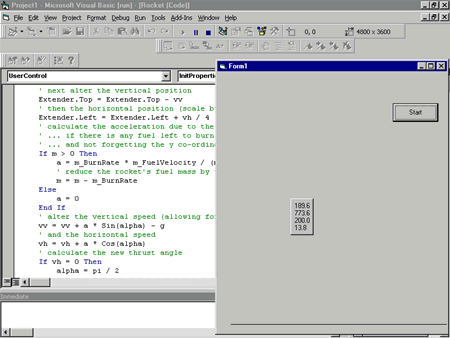
If you choose the default settings, you’ll see that the rocket starts off slowly vertically, very much like the real thing, and gradually gathers speed. You can observe the settings by the numbers which are displayed in the Rocket - the first gives the vertical velocity, the second the horizontal velocity, the third the amount of fuel remaining and the fourth the thrust angle in degrees. Eventually, the rocket runs out of fuel and falls back to earth.
You can also experiment with the settings, altering the payload, the thrust, the angle and the amount of fuel. You’ll see that for some settings the rocket doesn’t move - it’s too heavy to overcome the force of gravity or the thrust is too weak. Or you may find that the angle is such that your rocket crashes very quickly. All like the real thing - and without a differential equation in sight.
Improvements
There are criticisms that could be made concerning the ’rocket’. The first is pretty obvious - it doesn’t look like one. However, in defence I would point out that there is a long and honourable tradition of ’flying bedsteads’ in aeronautical research. A flying bedstead is designed to carry a lot of instrumentation and to prove the basic principle of the device. The Rocket control embodies exactly these points - it has a number of readouts and, being rectangular, looks rather like a bedstead. Still, fashion seems to demand pointed rockets. Next, as you may well observe, it’s quite possible to lose sight of your experimental rocket and its readings - there’s no telemetry. Third, there’s no error handling ("Houston, we have a problem…") and finally, the mathematics is very simple and in some ways not very realistic. I’ll be addressing some of these problems next issue.
What About The Math…?

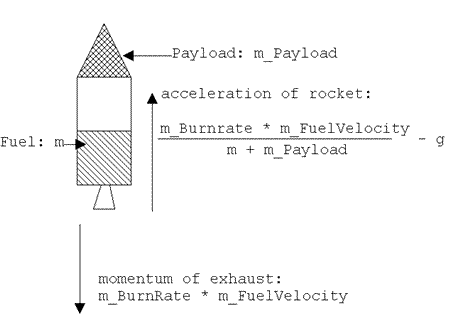
In contrast to a water powered rocket, the physics involved here isn’t very tricky. All that’s involved is a simple application of Newton’s Second and Third laws. The first thing to note is that the force on the rocket is the same as the momentum of the expelled fuel: this is how rockets work. The expelled momentum is equal to:
m_BurnRate * m_FuelVelocity
This force must act on the rocket in the opposite direction (Newton’s Third law) and so produces an acceleration on the rocket inversely proportional to its current mass (Newton’s Second Law)
a = m_BurnRate * m_FuelVelocity / (m + m_Payload)
The amount of fuel remaining is then reduced by the fuel used
m = m - m_BurnRate
Next, the vertical velocity is changed by the acceleration (adjusted for the thrust angle) reduced by gravity
vv = vv + a * Sin(alpha) – g
Similarly for the horizontal speed. Remember, there’s no time variables involved since, to make things simple, I’ve assumed that time ’ticks’ once every second.
vh = vh + a * Cos(alpha)
Finally, the thrust angle is adjusted (allowing for divide by zero problems):
alpha = Atn(vv / vh)
You can argue about how and where to adjust the thrust angle, but its easy for demonstration purposes to do it last. If the time ’ticks’ are sufficiently small, you’ll get a good approximation to reality.
See also: Part One of this series
