How To Create a Database Application in one line of code!
Wednesday 18 July 2007.
Here a simple Rails application (running in the web browser window at the top-left) is seen in the Ruby In Steel IDE. The Ruby code which we’ve entered to define the entire application is shown in the window beneath this. You can use an editor or IDE of your choice for this tutorial.
In a previous article, I explained how to create a very simple Ruby On Rails application without using a database. This sort of Rails application is very much the exception to the rule. In almost all ‘real world’ Rails applications, you will need some way of storing and retrieving data. For example, you may need to save the product details in an online store, the articles in a Wiki or the posts and comments in a Blog. The database part of a Rails application is called the Model - and that’s what I’ll be looking at in this article.
Note: This article assumes that you already have Ruby and Rails installed. This is explained in the previous article: Ruby On Rails Tutorial: The Basics
MySQL is one of the most widely used (and freely available) database programs which can be used with Rails. For the sake of simplicity, I’ll be using MySQL in this example. For information on downloading and installing MySQL see Install MySQL For Windows.
First, Create The Database
You can create a MySQL database from a prompt or using a graphical interface. In this article, I’ll stick to using the MySQL prompt.
The MySQL prompt should have been added as a menu or icon when you installed MySQL. On Windows, you can find this by navigating from the Start Menu to Programs, MySQL, MySQL Server, MySQL Command Line Client. You will now be prompted for your MySQL password. With luck, you will have remembered the password you created when installing MySQL or just press Enter if you didn’t specify a password. Now you should be presented with the prompt:
mysql>
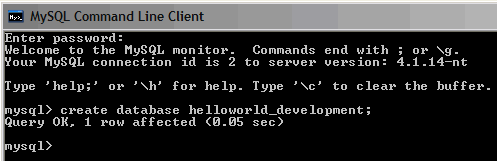
We’ll create a development database for the helloworld program so enter this at the prompt (be sure to put the semicolon at the end):
create database helloworld_development;
MySQL should confirm that this has been created (it will respond with a ‘Query OK, 1 row affected’ message).
To verify that the database has been created, enter this (remember that semicolon again!):
show databases;
MySQL should display the database name, helloworld_development, along with any other databases that you may have created previously. Make this database active. Enter:
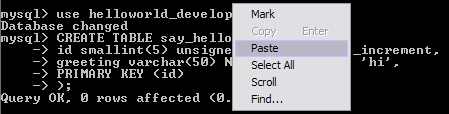
use helloworld_development;
Now let’s add a table. Enter the following, line by line, at the MySQL prompt:
To save time and the possibility of error, you can copy the code above (in the code box, press Ctrl-A to select and Ctrl-C to Copy. In Windows, you can paste the script into the MySQL window, at the prompt, by right-clicking the window and selecting Paste from the menu.
All being well, MySQL will respond by informing you:
Query OK, 0 rows affected
Entering table definitions at a prompt, is quite error prone which is why you might prefer to use a graphical tool such as SQLYog in future. A free version of SQLYog is available from http://www.webyog.com/. In fact, Rails can also simplify database creation and maintenance using a technique called ‘migrations’ in which databases are managed using Ruby code. Migrations are beyond the scope of this article but see the references later on for links to more information on this and other Rails development topics.
Now we need to run a script to create a model. If you followed part one of this tutorial, you will already have a /hello_world directory. In that case, open a command prompt in the /hello_world directory now. Now skip ahead to the section of this article called Creating The Model.
If you didn’t follow the previous tutorial, you will need to create a simple ‘hello world’ application before you can go any further. To do this, open a command prompt (e.g. in Windows, click Start, Run and enter cmd) then navigate to the directory into which you wish to create the application (let’s say it’s called ‘C:\railsapps’and enter the command:
rails helloworld
The disk will chug away for a while and then Rails should tell you that a whole load of directories and files have been created.
Now change to the \helloworld directory (on Windows, enter cd helloworld) and, at the prompt, enter (making sure to use the capitalization exactly as shown):
ruby script/generate controller SayHello
You should now be informed that several files have been created while others already exist.
Creating The Model
Now, let’s generate the model. Make sure that you are at the command prompt in the ‘top level’ directory of your Rails application (e.g. C:\Railsapps\helloworld). Enter this command:
ruby script/generate model SayHello
The output will inform you that some folders already exist (we created them earlier) but several Ruby source files have been created, including:
app/models/say_hello.rb
Check that you have your configuration file set up to use this database. Load the file database.yml from the \config directory into an editor of your choice and verify that the text includes something similar to the following (don’t worry about any other database declarations in this file; they can be left alone):
development:

  adapter: mysql

  database: helloworld_development

  username: root

  password:

  host: localhost
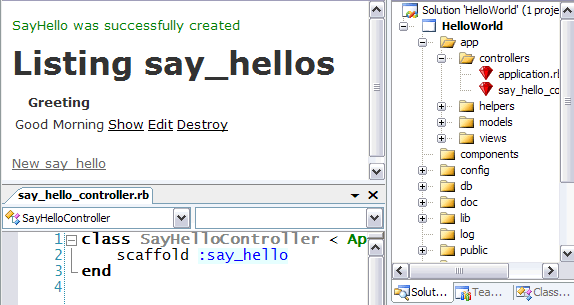
Here, as you can see, I am using no password as I haven’t set up any password with MySQL and so that field is left blank in database.yml . If you use a MySQL password you should enter that password here. Now, open your controller file, say_hello_controller.rb (in the \app\controllers folder), and edit the file so that it contains the following code (and no more):
Start your web server. For the sake of simplicity, I’m assuming that you will use the WEBrick server supplied with Rails. At the system prompt in your \helloworld directory, enter:
ruby script/server
After a few moments, WEBrick should start up. If, on the other hand, it displays error messages, you may be running on a port that is already in use. If so, try entering another port (here 3003), like this:
ruby script/server -p3003
Finally, it’s time to let the magic begin! Go into the browser and enter the address (but use the number 3003 instead of 3000 if that was the port you specified when running the server):
http://localhost:3000/say_hello/
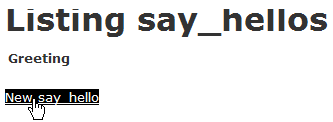
You will find that a hyperlink is shown: ‘New say hello’ as seen below...
Click the New say hello link. This loads a page with a text field labeled ‘Greeting’ and a default value, ‘hi’ (shown below).
Rails has automatically created this page based on the database table definition which we entered earlier:
greeting varchar(50) NOT NULL default 'hi',
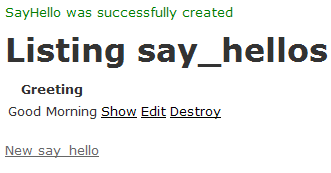
Edit the text in the edit box to something different such as “Good Morning” and press the ‘Create’ button. This will add a new record to the database table and display another page showing the new record followed by three links: ‘Show’, ‘Edit’ and ‘Destroy’.
You can play around with those links at your leisure. For now, create another greeting. Click ‘New say hello’, enter “Good Afternoon” and click ‘Create’. Now you have two records… and so it goes on.
Before moving on, there are a couple of important things to know. First, as so often in Rails, the naming conventions are vital. If I had called my table ‘Greetings’ instead of ‘say_hellos’, Rails would not have been able to link together the database with the other parts of the application. When you create a database table in Rails, you need to name it with the plural form of the class name you used – remembering to use lowercase letters and underscores as needed. The second important thing to notice is the scaffold method which we call in the controller:
scaffold :say_hello
Scaffolding is Rails’ way of creating a ready-to-run view of your data complete with actions (hyperlinks and associated data manipulation methods) to list, show, create, edit and destroy the objects representing each data record. Scaffolding is great for testing your databases quickly and can form the basis of more sophisticated customized views. In the present case, however, this simple call to the scaffold method takes precedence over our index view, so even if you still have all the embedded Ruby code in your index.html file (from part one of this tutorial), this will no longer be displayed. Comment out the call to scaffold and any custom view will reappear.
Huw Collingbourne is a director of SapphireSteel Software, developers of the Ruby In Steel Ruby and Rails IDE for Visual Studio 2005: http://www.sapphiresteel.com.