[ Go back to normal view ]
BW2 :: the bitwise supplement :: http://www.bitwisemag.com/2
Introduction To Delphi
Follow our quick-start guide to developing applications with Delphi5 September 2006
by Huw Collingbourne
With the release of free versions of the Borland language products, there has never been a better time to learn to program in Delphi.
- Right-click to download the source code
In this article, we’ll take a quick tour of the ‘classic’ version of Turbo Delphi For Win32. Once you are up to speed with the IDE, move on to our Guide to the Object Pascal language.
Download Turbo Delphi from: http://www.turboexplorer.com
- This is the Turbo Delphi environment, showing the form designer in the middle of the screen, with the Object Inspector at the bottom-left and the Tool Palette bottom-right.
Design The User Interface
Click New on the File menu. A submenu pops out listing the available project types. Select ‘VCL Forms Application - Delphi For Win32’. At this point, a blank form appears.
Note: To switch between the form designer and the code editor, click the code and design tabs at the bottom of the working area. You can design an application by dropping components onto this form from the Tool Palette at the bottom right hand corner of the Delphi environment. The components in the Tool Palette are arranged into groups. You can switch from one group to another by clicking the Categories button and making a selection from the drop-down list.
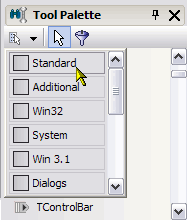
- The Delphi Tool Palette
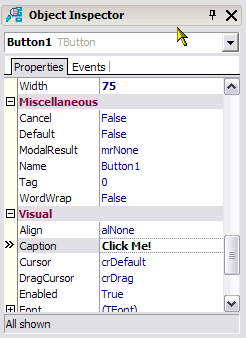
For now we’ll stick with the Standard group. Click TEdit in the Tool Palette. Now click somewhere on the blank form. A new TEdit control, named Edit1, will appear at the position where you clicked. You can move the TEdit control by dragging it with the mouse. You can resize it by selecting and dragging an edge or a corner. Now click TButton in the palette and drop one of these onto the form. You will now have a button named Button1. You can change the name of the button using the Object Inspector at the bottom-left of the Delphi workspace. Scroll to the bottom of the Inspector and find the Caption property in the Visual group. Select ‘Button1’ in the right-hand column and edit this to ‘Click Me!’.
- Click the tabs at the top of the Object Inspector to switch between Properties and Events.
Notice that this causes the caption of the button on the form to change too.
Hint: The Object Inspector can either display properties groped by category or arranged as an alphabetical list. To switch between the two views, right-click the Object Inspector and, from the popup menu, select Arrange. Cracking The Code
So much for form design. Without more ado, let’s start writing some code. Start a new project (File, New, VCL Forms Application – Delphi For Win32). When asked if you want to save the changes to the current project, click ‘No’.
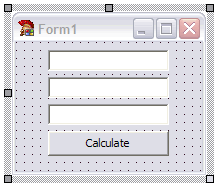
Drop onto the form three TEdit controls one beneath the other and set their Name properties to SubtotalEd, TaxEd and GrandtotalEd. This is going to be a Tax calculator which will calculate Tax based on a value entered into the Subtotal edit box. We don’t want any text displayed in the edit fields, so select each control in turn and delete the string from the Text property in the Object Inspector.
Note: If the Object Inspector is in ‘Category View’, the Name property is found in the Miscellaneous category; the Text property is in the Localizable category. Drop a Button onto the form, name it CalcBtn and set its Caption property (in the Visual category of the Object inspector) to ‘Calculate’:
- Design a user interface simply by dropping controls onto a form
Double-click the ‘Calculate’ button. This creates an event-handling procedure for the default Click event. If you need to code methods to handle other events such as key presses, you should use the Events tab in the Object Inspector and double-click specific events to create event-handling methods. Double-clicking the CalcBtn button causes Delphi to create an empty event-handling procedure named TForm1.CalcBtnClick (in fact, the first part of the procedure name may vary – for example, it may be TForm2 or TForm3, if you have previously created other forms).
Edit this procedure to match the following (but don’t change the procedure name if, for example, Delphi has created a procedure starting with TForm2 rather than TForm1):
procedure TForm1.CalcBtnClick(Sender: TObject);

var

  subtotal, tax, grandtotal : real;

  errcode : integer;

begin

  Val(SubtotalEd.Text, subtotal, errcode);

  if errcode =  0 then

  begin

    tax := (subtotal * 0.175);

    grandtotal := subtotal + tax;

    TaxEd.Text := FloatToStr(tax);

    GrandtotalEd.Text := FloatToStr(grandtotal);

  end;

end;
Before attempting to run this project, check your code carefully. Delphi’s Object Pascal language requires that each variable be declared in the var section beneath the procedure header. Variables of the same type may be separated by commas, followed by a colon, the data type (such as real or integer) and a semicolon. Each procedure starts with the begin keyword and ends with the end keyword followed by a semicolon. These two keywords perform a similar function to the curly brace delimiters in C-like languages. Code blocks are also delimited by begin and end. Statements are terminated by semicolons. Pascal is not case sensitive so you can mix capital and lowercase letters at will.
Now let’s see what this code actually does. It starts by using the built-in Val() procedure to convert the string, SubtotalEd.Text to a real (floating point) number, subtotal. Remember that SubtotalEd is the name we gave to the first Edit control on the form; Text is the property which sets or gets the text contained by the Edit control. In this code, it returns the string that has been entered into SubtotalEd by the user. If the conversion of the string to a real number fails (say, because the string entered contains a non-numeric character), the Val() procedure assigns the index of the problem character in the string to the integer variable, errcode.
If there are no errors (that is, if errcode is 0) the block of code between the begin and end; following the if test is executed; otherwise that block of code is skipped. The code in this block starts by doing a calculation on the subtotal value (here, it multiplies subtotal by 0.175 to obtain a tax rate of 17.5%) and assigns the result to the variable, tax.
Note that a plain equals is used to test equality as in the expression if errcode = 0 whereas a colon followed by an equals is used when assigning a value as in: tax := (subtotal * 0.175); The grandtotal variable is then assigned the value of subtotal plus the value of tax. Before we can display the result on screen, the floating point values, tax and grandtotal have to be converted back to strings.
The FloatToStr() function returns the string representation of a floating point value. You can find out more about Delphi’s standard functions by highlighting the function name in the editor and pressing F1 to display help. The value returned by FloatToStr() may be assigned to a variable or (as here) to the Text property of visual controls:
TaxEd.Text := FloatToStr(tax);

GrandtotalEd.Text := FloatToStr(grandtotal);
Run the program by pressing F9. If there are any syntax errors, Delphi displays error messages at the bottom of the screen and highlights the erroneous line of code. Fix any errors then run the program again. If you still have problems you can load my firstprog.dpr project. Try entering a numerical value into the first edit box, SubtotalEd. When you click the button, the code of the TForm1.CalcBtnClick() procedure will be executed. Assuming there is no error in your input, the code converts the string in the SubtotalEd control to a floating point value, multiplies it by 0.175 to obtain a 17.5% Tax value, adds that to the subtotal to obtain the grand total, converts those values back to strings and displays them in the two other edit controls.
Delving Deeper
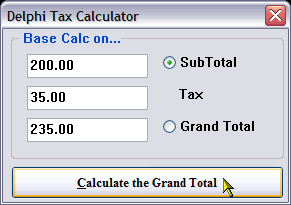
One weakness of this program is that it does nothing when it encounters an input error. It would be more civilised if it at least produced a meaningful error message. I’ve rewritten the project to do that in the calctest.dpr project (in the source code archive). It would be better still if the user could optionally calculate a subtotal from a grand total as well as the other way about. I’ve added that feature to the CalcTax.dpr project. These projects introduce some more complex Object Pascal coding techniques which are described in comments in the source code.
- The CalcTax project not only gives you the option either to add or subtract tax; it also deals more effectively with errors. It won’t, for example, try to do a calculation when no value has been entered; and if it finds a non-numeric character in the input, it highlights it after displaying a message.


