First Install Ruby and Rails…
This tutorial assumes that you have both Ruby and Rails installed. Furthermore, it also assumes that you have a passing familiarity with the Ruby language. For a guide to installing Ruby and doing some simple Ruby programming, see the Bitwise Introduction to Ruby. For a more comprehensive tutorial on the Ruby language, download a free copy of The Little Book Of Ruby from the SapphireSteel Software web site.
Once you’ve got Ruby up and running, you will need to install a copy of the Rails framework. There are various ways in which you can install Rails. One way is by using the Ruby Gem ‘package manager’. As long as you are connected to the Internet, this will go online to find and install the latest version of Rails. To install Rails in this way (assuming you already have Ruby with Gems installed), at the command prompt, enter:
gem install rails –include-dependencies
Alternatively you may download and install Rails from the Ruby On Rails web site, http://www.rubyonrails.org. Most Rails applications require a database to. You will need to install a database as a separate operation. The free MySQL database server is widely used for this purpose. Refer to the Bitwise article on Installing MySQL for Windows. For the sake of simplicity, we won’t use a database in this month’s project. All the same, you may as well get one installed as you will need it later. I’ll explain how to create a database Rails application in a later article.
Windows users also have the option of using the InstantRails installer. This installs Ruby, Rails, the Apache web server and MySQL. Everything is put into a separate directory structure so should, in principle, be able to cohabit with any other Ruby installations on the same PC without causing any unforeseen side-effects. In fact, I’ve found that InstantRails can sometimes be problematic if you already have a separate installation of Apache. Otherwise, this is probably the easiest way to get up and running with Rails in one fell swoop. Download InstantRails from: http://instantrails.rubyforge.org/wiki/wiki.pl
A First Ruby On Rails Application
OK, without more ado, let’s start programming with Rails. Before starting this, I’ll assume that you have Rails installed, along with the WEBrick web server (this server is normally provided as part of your Rails installation). Alternatively, you may use some other server such as LightTPD or Mongrel, but the use of these servers is not described in this article. You will also need, at the very least, a text editor and a web browser.
Note: Many of the screenshots in this article show Ruby In Steel, the Ruby and Rails IDE for Visual Studio.
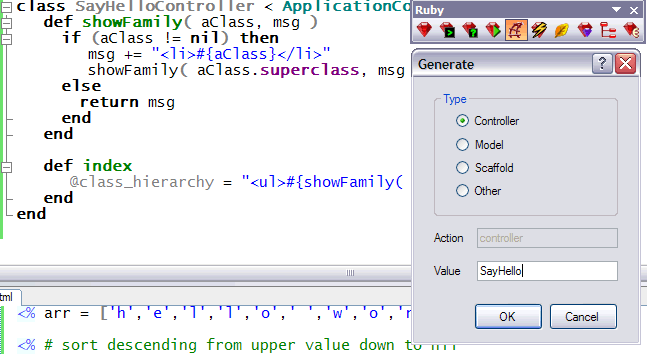
As one of the developers of Ruby In Steel, I admit a strong personal bias in favour of this IDE. If you are using Ruby In Steel you will be able to run the Rails commands, open files and perform various other activities (editing, debugging and project management) from within the IDE itself rather than having to enter commands at the system prompt. For the purposes of this tutorial, however, I am making no assumptions about your IDE, so you should be able to follow along on any OS, using just a basic editor, file manager and command prompt.
|
To begin, open a system prompt (on Windows, select Start Menu, Run, and enter cmd). Navigate to a directory into which you intend to place your Rails applications. Let’s assume this is C:\railsapps. Check that Rails is installed and on the system path. To do this, enter:
rails
All being well, you should now see a screenful of help about using the rails command. If not, there is a problem with your Rails installation which you need to fix before continuing.
Assuming Rails is working, we can now create an application. Still at the prompt, enter this:
rails helloworld
After a bit of whirring of your hard disk, you should see a list of the files which Rails has just created:
create app/controllers
create app/helpers
create app/models
create app/views/layouts
create config/environments
create components
create db
create doc
create lib
create lib/tasks
create log
create public/images
…(etcetera)
Take a look at these files using your computer’s file manager (e.g. the Windows Explorer). Beneath the directory in which you ran the Rails command (\helloworld), you will see that several new directories have been created: \app, \components, \config, \db and so on. Some of these have subdirectories. The \app directory, for example, contains \controllers, \helpers, \models and \views. The \views directory itself contains a subdirectory, \layouts, and so on.
The directory structure in a Rails application is far from random; the directories (or ‘folders’) and the names of the files they contain define the relationships between the various parts of the application. The idea behind this is that, by adopting a conventional file-and-folder structure in each rails application, you can avoid the necessity of writing lots of configuration files to link the various bits of the application together.
Now, at the system prompt, change directory to the top-level folder (\helloworld) of your newly generated Rails application. Assuming you are still in the C:\railsapps directory and you named the Rails application helloworld, as suggested earlier, you would (on Windows) enter this command:
cd helloworld
Now, to run the server, enter:
ruby script/server
Here script is a directory which was created when you ran the rails command and server is the name of a code file which runs the WEBrick server. You should now see something similar to the following:
=> Booting WEBrick...
=> Rails application started on http://0.0.0.0:3000
=> Ctrl-C to shutdown server; call with —help for options
[2006-11-20 13:46:01] INFO WEBrick 1.3.1
[2006-11-20 13:46:01] INFO ruby 1.8.4 (2005-12-24) [i386-mswin32]
[2006-11-20 13:46:01] INFO WEBrick::HTTPServer#start: pid=4568 port=3000
If, instead of the above output, you see error messages, check that you have entered the server command exactly as shown from the appropriate directory (\helloworld):
ruby script/server
If you still have problems, it is possible that the default port (3000) is already in use – for example, if you already have an Apache server installed on the same PC. In that case, try some other value such as 3003, placing this number after -p when you run the script:
ruby script/server –p3003
Now fire up a web browser. Enter the host name, followed by a colon and the port number into its address bar. The host name should (normally) be localhost and the port number should match the one used when starting the server or else it defaults to 3000. Here is an example:
http://localhost:3000/
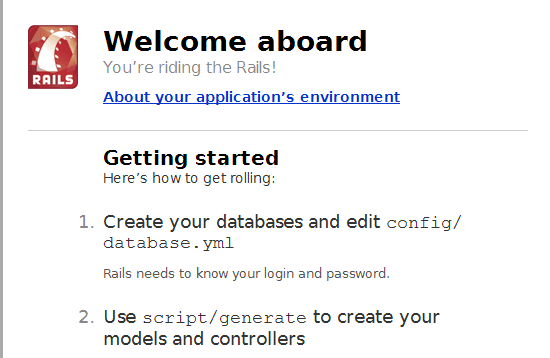
The browser should now display a page welcoming you aboard Rails. If not, verify that your server is running on the port specified in the URL.
Create A Controller
The Controller is where much of your Ruby code will live. It is the part of the application that sits between the View (what appears in the browser) and the Model (what happens to the data). As this is a ‘Hello world’ application, let’s create a Controller to say hello. In the spirit of originality, I’ll call this the SayHello controller. Once again, you can create this by running a script at the system prompt. You will need to open another command window in the directory from which you previously ran the server (e.g. C:\railsapps\helloworld). You can’t re-use your existing command window as the server is running in that one and you would need to close it down to get back to the prompt – and that would stop our Rails application from working!
At the prompt enter:
ruby script/generate controller SayHello
After a few moments, you will be informed that the following files and directories have been created (the script will also tell you that some directories already exist and are, therefore, not created):
app/views/say_hello
app/controllers/say_hello_controller.rb
test/functional/say_hello_controller_test.rb
app/helpers/say_hello_helper.rb
The generate controller script also creates one other Ruby file, application.rb, which is the controller for the entire application, plus a folder, /views/say_hello, which we shall make use of shortly.
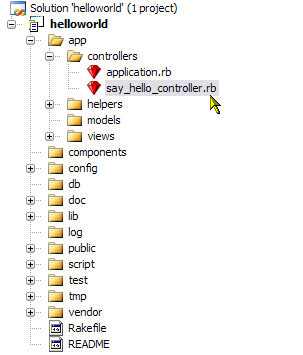
Notice how Rails has parsed the name SayHello into two lowercase words, say and hello, separated by an underscore and it has used this name as the first part of three separate Ruby files. This is just one example of the ‘configuration by convention’ approach which Rails uses. Here the Ruby files say_hello_controller_test.rb and say_hello_helper.rb are supplied as repositories (should you so wish) for unit testing and utility code respectively. More important, though, is the controller file itself, say_hello_controller.rb, which has been created in \helloworld\app\controllers. Open this file in a text editor. This empty method has been auto-generated:
class SayHelloController < ApplicationController

end
Inside this class we can write some code to be executed when a certain page is displayed. Edit the class definition to match the following:
class SayHelloController < ApplicationController

   def index

      render :text => "Hello world"

   end


   def bye

      render :text => "Bye bye"

   end

end
This now contains two methods, index and bye. Each method contains a single line of code. In spite of the fact that I have omitted brackets (a bracket-light style of coding is favoured by many Rails developers), anyone familiar with Ruby should be able to deduce that render is a method which takes a Hash as an argument; the Hash itself containing a key-value pair comprising a symbol and a string. For bracket-lovers, the index method can be rewritten like this:
def index

   render( { :text => "Hello world" } )

end
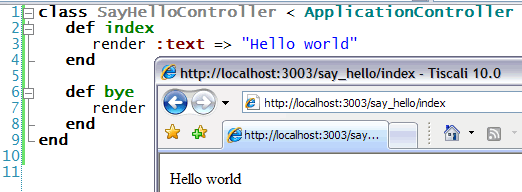
And there you have your first real Rails application. To try it out you need to go back to the web browser and enter the full ‘address’ of the two functions you just wrote. The address takes the form of the host and port (the same as you entered previously – for example, http://localhost:3000), plus the name of the controller (/say_hello) and finally the name of a specific method (/index or /bye). Try entering these into your browser’s address field, once again ensuring that you use the appropriate port number if it is not 3000:
http://localhost:3000/say_hello/index
http://localhost:3000/say_hello/bye
Your browser should display “Hello world” and “Bye bye” respectively for each address.
In fact, Rails uses the index method as a default so you can omit that part of the URL:
http://localhost:3000/say_hello
Before moving on, let’s take a closer look at the class we are using. Rails has named the class by appending Controller to the name which we specified when running the controller generator script (HelloWorld) and it has made it a descendant of the ApplicationController class:
class SayHelloController < ApplicationController
So what exactly is the ApplicationController class? Now, you may recall that I mentioned that the generate/controller script which we ran earlier silently created a file called application.rb inside the /app/controllers folder. This file is the application controller and, if you open it, you will see that it contains this class:
class ApplicationController < ActionController::Base

end
So, our SayHelloController class descends from the ApplicationController class which itself descends from the Base class in the ActionController module. You can prove this by climbing back through the hierarchy and asking each class to display itself. This, incidentally, also gives us the chance to try doing some real Ruby programming in the SayHelloController class. Just edit the contents of that file to match the following (or copy and paste the code below):
class SayHelloController < ApplicationController

   def showFamily( aClass, msg )

     if (aClass != nil) then

        msg += "<br>#{aClass}"

        showFamily( aClass.superclass, msg )

     else

       render :text => msg

     end

   end


   def index

      showFamily( self.class, "Class Hierarchy of self..." )

   end

end
To see the result, enter this address into your browser (once again, change the port number from 3000 if necessary):
http://localhost:3000/say_hello/
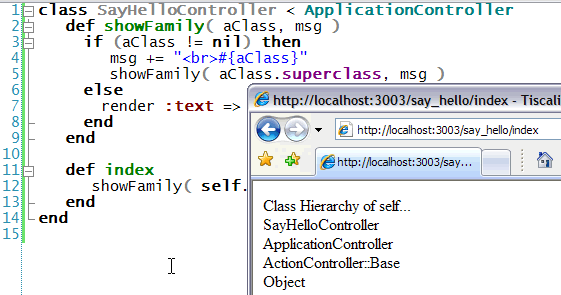
As you can see, a controller file is Ruby code. You can use all the usual Ruby classes such as strings and Hashes and you can call methods and pass arguments. But bear in mind that the end result needs to be displayed in a web page. This has certain consequences. For example, instead of putting linefeeds "\n" strings, you should use HTML paragraph, <P> or break <br> tags, and it is only permissible to call render once each time a page is displayed, which explains why I’ve constructed a string in the course of calling the method recursively and then passed this to the render method right at the end.
The generate Controller script Summarized…
Let’s briefly go over what’s happening when we run the generate controller script. Each time a new controller is generated it creates a Ruby code file in the app/controllers directory, with a name matching the name you entered but all in lowercase with any capitals you specified being preceded by an underscore and _controller appended. So, if you entered SayHello the controller file will be called say_hello_controller.rb). The controller will contain a class definition such as: SayHelloController. You may also specify views, such as index and bye…
ruby script/generate controller SayHello index bye
In this case, the Controller class will automatically be provided with methods with names matching those views (def index and def bye). At any rate, whether or not you specify views, a folder in the /views directory is created with a name matching the controller (views/say_hello). In fact, the script also creates a few other files including some more Ruby files in the /helpers folder, but we can ignore these for the time being.
If you specified view names when running the controller script, some files with matching names and the extension .rhtml will be added to the appropriate view folder. For instance, if you entered the command…
ruby script/generate controller SayHello index
…the /views/say_hello directory should now contain a file called index.rhtml. If, on the other hand, you entered…
ruby script/generate controller Blather index bye snibbit
…the views/blather directory should now contain three files: index.rhtml, bye.rhtml and snibbit.rhtml.
Create A View
While it would be, just about, possible to create an entire application by coding everything inside a Controller, you would end up with some pretty ugly web pages. In order to apply a bit more formatting you need to create a View. You can think of a View as an HTML page that will be displayed when someone logs onto a specific web address – in which case, the name of the View forms the final part of the address (as in the previous examples where the /index and /bye parts of the URL took us to views which displayed data supplied by the index and bye methods in the controller.
In order to create views which match these web addresses and corresponding method names, we just need to append a view name when generating the controller. Enter this command at the prompt (still in your \helloworld directory) to create an index view for SayHello:
ruby script/generate controller SayHello index
As you have already created a controller, the script will pause and ask if you wish to overwrite say_hello_controller.rb. Enter N for ’No’.
Now that we have a view, we can edit give the template (.rhtml) file in order to control the way that data is displayed in the web page. That means we won’t need to display plain, unformatted text using the render method in the controller from now on. But, with the view now being out of the controller’s control (so to speak), how can the controller pass data to the view? It turns out that it can do this by assigning data to an instance variable.
Edit the code in say_hello_controller.rb (or delete it and paste in my code below):
class SayHelloController < ApplicationController

   def showFamily( aClass, msg )

     if (aClass != nil) then

        msg += "<li>#{aClass}</li>"

        showFamily( aClass.superclass, msg )

     else

       return msg

     end

   end


   def index

      @class_hierarchy = "<ul>#{showFamily( self.class, "" )}</ul>"

   end

end
This version calls the showFamily() method in order to build up a string inside two HTML ’unordered list’ tags, <ul> and </ul>. Each time a class name is found it is placed between two HTML ’list item’ tags <li> and </li>. The complete string forms a valid HTML fragment and the index method simply assigns this string the a variable named @class_hierarchy.
All we need to do now is to find some way of putting that HTML fragment into a fully formed HTML page. That’s where the view comes in. Open up the view file, index.rhtml, in the views/say_hello folder. According to the Rails naming convention - this is the default view (the ’index’ page) which is partnered with the say_hello_controller.rb file. Since Rails works out relationships based on file, folder, class and method names, we don’t have to include any files by name or write any configuration details.
The index.rhtml file already contains a fragment of HTML code. Delete it and replace it with this:
<h1>This is the Controller's Class Hierarchy</h1>

<%= @class_hierarchy %>
The first line is nothing more than plain HTML formatting as a heading between <h1></h1> tags. The next line is more interesting. It contains the variable, @class_hierarchy, which we just assigned in the controller, placed between two odd-looking delimiters <%= and %>. These are special Rails tags. They are used to embed bits of Ruby which will be executed prior to displaying a web page in the browser. The page that is finally displayed will be a fully-formed HTML page which includes any HTML fragments from the view file plus the results, after execution, of any embedded Ruby code. Try it out now, by entering the page address into your browser:
http://localhost:3000/say_hello/
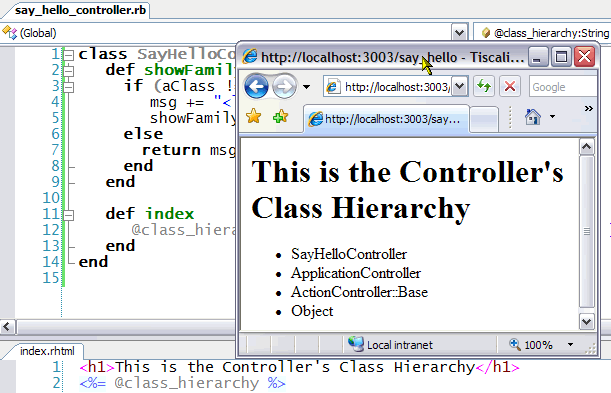
This should now display the heading "This is the Controller’s Class Hierarchy" in big, bold letters followed by a list of classes, each element of which is preceded by a dot. You could, if you wish, remove all the HTML from the view file by creating the heading in the controller and assigning the resulting string to another variable. You can do this by editing the index method in say_hello_controller.rb to this:
def index

   @heading = "<h1>This is the Controller's Class Hierarchy</h1>"

   @class_hierarchy = "<ul>#{showFamily( self.class, "" )}</ul>"

end
Then edit the view file (/app/views/say_hello/index.rhtml) to this:
<%= @heading %>

<%= @class_hierarchy %>
If you do this, the end result, as displayed in the web page, will remain unchanged.
There are two variations on the Rails tags which you can place into RHTML files. The ones we’ve used so far include an equals sign at the beginning, <%=. These tags cause Rails not only to evaluate Ruby expressions but also to display the results in a web page. If you omit the equal sign in the opening delimiter <% then the code will be evaluated but the result will not be displayed.
If you wish, you can place quite long pieces of code – your entire Ruby program even! - between <% and %> tags and then use <%= and %> when you want to display something in the web page. In fact, we could rewrite our application by omitting the controller entirely and putting everything into the view. Try it by editing app/views/say_hello/index.rhtml to match the following:
<% def showFamily( aClass, msg )

     if (aClass != nil) then

        msg += "<li>#{aClass}</li>"

        showFamily( aClass.superclass, msg )

     else

       return msg

     end

   end %>


<%= "<ul>#{showFamily( self.class, "" )}</ul>" %>
In this particular case, the text that is displayed on the web page is slightly different than before since it now shows the class hierarchy of the view’s class, rather than of the controller’s class. As you will see, views descend from the ActionView::Base class.
You can also divide up a contiguous block of code by placing the individual lines between <% and %> tags instead of placing the entire block between a single pair. The advantage of doing this is that it lets you put standard HTML tags outside the individually delimited lines of Ruby code. If you like, try this out by deleting everything from index.rhtml and add this in its place:
<% arr = ['h','e','l','l','o',' ','w','o','r','l','d'] %>


<% # sort descending from upper value down to nil

reverse_sorted_arr = arr.sort{

        |a,b|

                b.to_s <=> a.to_s

        } %>


<% i = 1 %>

<ul>

<% reverse_sorted_arr.each{ |item| %>

<li><%= "Item [#{i}] = #{item}" %></li>

<% i += 1 %>

<% } %>

</ul>
Here I’ve assigned an array of chars to the variable, arr, between one set of tags; I’ve written a block to reverse-sort the array and assigned the result to another variable between a second set of tags; then I’ve assigned 1 to the variable, i; and then finally I’ve written this method:
reverse_sorted_arr.each{ |item|

   "Item [#{i}] = #{item}"

   i += 1

}
But instead of enclosing the method between a single set of tags, I’ve enclosed each separate line within its own pair of tags. Why should I do this? Well, there are two reasons. First, I want the string in the middle of the block to be displayed on the web page, so I need to use the <%= tag there:
<%= "Item [#{i}] = #{item}" %>
And secondly, I want the whole set of stings to be displayed as an HTML list. So I’ve placed the <ul> and </ul> tags before and after the Ruby code block; and, I’ve placed the line of code which displays each array item inside <li> and </li> tags. Notice that these tags are inside the Ruby code block, but outside the embedded Ruby tags on this particular line:
<li><%= "Item [#{i}] = #{item}" %></li>
Once again, try this out in the browser:
http://localhost:3000/say_hello
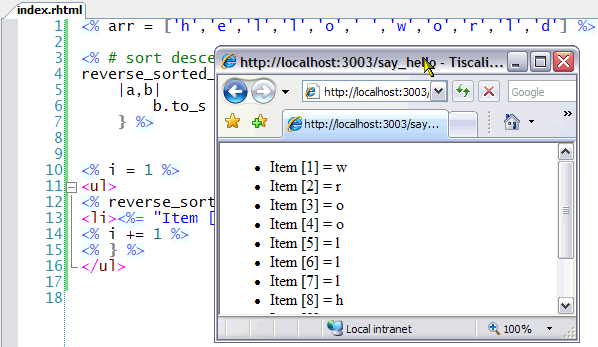
So by dividing up a contiguous block of Ruby code into separately delimited lines, I have been able to do the useful trick of mixing HTML into Ruby code! To be honest, I haven’t really mixed it in at all – the Ruby code is still closed off inside the tags; what I’ve done is told Rails to mix in the HTML at specific points prior to displaying the page in a web browser.
Incidentally, you may find it interesting to compare the version of the application which puts all the embedded Ruby code into the view (index.rhtml) with the previous version in which the code was all put into the controller (say_hello_controller.rb) and only tiny bits of embedded Ruby (a couple of variables) were placed into the view:
<%= @heading %>

<%= @class_hierarchy %>
You will probably agree that the first version, in which the code and formatting were kept separate, is neater. On the whole, Ruby code belongs in Ruby code files and HTML formatting belongs in HTML files. While embedded Ruby provides an easy way of letting a view and a controller communicate, it is generally better to keep embedded Ruby code short and simple and put more complex Ruby code into Ruby code files.
Now that we’ve got to grips with a controller and a view, it’s time to move onto the model. That will be the subject of my next article…
Huw Collingbourne is a director of SapphireSteel Software, developers of the Ruby In Steel Ruby and Rails IDE for Visual Studio 2005: http://www.sapphiresteel.com