It is always a nice feature to be able to customize the look and layout of an application. With a bit of work - and a few devious tricks - it is actually possible to let users alter the layout of a Delphi application at runtime. For example, they can drag buttons around on a form, resize them and save the finished design to disk so that it can be reloaded at a later stage. Similarly, they could change and save the buttons’ captions, fonts, colours and other properties.
Delphi itself already knows how to save a form to disk. It does this every time you create a user interface. Look in any of your Delphi project directories and you will see a file with the extension ’.DFM’. This is a file containing the form description. When you next load your project, Delphi reads this file and uses it to recreate the form in the form designer.
Delphi’s form designer needs to be able save and load custom components in addition to its standard components. Consequently, its saving and loading capabilities are made available to component writers. And if they are available to component writers, that means they are available to the rest of us too. All we have to do is find them.
If you spend some time hunting through the Delphi help files, you will eventually discover that there are two key methods needed to write and read components. These methods are, logically enough, called WriteComponent() and ReadComponent() and they belong to the TStream class.
When you locate the help entry TStream you will discover that "TStream is the base class type for stream objects that can read from or write to various kinds of storage media, such as disk files, dynamic memory, and so on."
The TStream descendant that saves data to disk is called TFileStream. The documentation provided on these classes is pretty sparse. Initially it took me a good deal of trial and error to figure out how to use them. With luck, you’ll be able to learn from my mistakes without having to go through the same process!
Components In the Stream
Load up the saveform.dproj project. The two key methods in this project are TForm1.SaveBtnClick() and TForm1.LoadBtnClick(). These save and load binary representations of the controls on the form to and from disk. Let’s look first at SaveBtnClick().
This declares an object variable, fs, of the TFileStream class type. As with all objects, a TFileStream must be created, using the Create constructor, prior to being used. In this case, the Create constructor takes two arguments - a file name and a mode. The mode argument must be one of the file mode constants described in Delphi help.
Here the file name argument is supplied by the text in the combo box, ComboBox1. The mode argument is fmCreate which causes the TFileStream object to create a new file, if necessary replacing any existing file with the same name:
fs := TFileStream.Create( ComboBox1.Text, fmCreate );
Once we’ve done this, it’s simple to save the components. We just iterate through the components on the form by counting from 0 to ComponentCount-1. We then write each component in the form’s Components property, into the stream (and onto disk) using the WriteComponent() method:
for i := 0 to ComponentCount-1 do

      fs.WriteComponent(Components[i]);
For safety’s sake, this code is placed inside the ’try’ block of an exception handler. Unlike the ’except’ part of a ’try..except’ exception handler, the ’finally’ part of a ’try..finally’ exception hander is executed whether or not an exception actually occurs. In the ’finally’ part here, the TFileSteam object, fs, is destroyed and its memory is reclaimed by the Free method.
This rather simple piece of code is all that is needed to save the components to disk. The final statement in the SaveBtnClick() method is a procedure call to UpdateComboList. This procedure searches for any previously saved configuration files (I’ve given them the extension ’dwf’, short for ’Delphi Windows Form’) on disk. If any files are found these are listed in ComboBox1.
The code in LoadBtnClick(), which loads up a previously saved configuration, is just as straightforward. Indeed, it is almost identical to the code in SaveBtnClick() apart from the mode argument in TFileStream.Create() which is now fmOpenRead and the method inside the for loop which is now ReadComponent rather than WriteComponent. I’ve also called the FileOK() function, which you can find at the top of the unit, to check that the file name in ComboBox1 actually exists.
Let’s see this code in action. Run the program and click the ’Load Form’ button. This will load the component configuration saved in the file, default.dwf, which is the file name displayed in the combo box. The properties loaded from this file are automatically applied to the appropriate components on the form. I’ve saved several more configuration files. Try each by selecting its name from the combo box and clicking ’Load Form’. Notice that it is not just the size and position properties that are loaded. Even the text inside the Memo is loaded too.
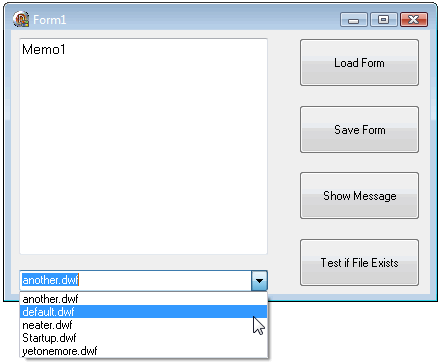
In the first project you can select previously saved form designs from a combo box...
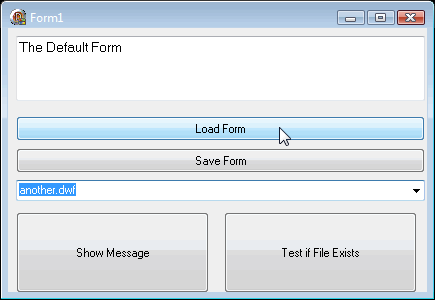
Click the ‘Load Form’ button and the layout is loaded and applied to the running application...
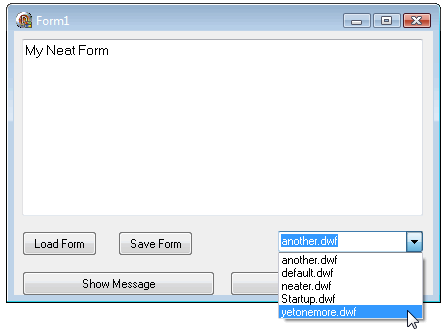
Not only the positions of controls are loaded but also other properties - even the text in the Text Box...
This project does not provide any way of letting you alter its configuration at run-time. So if you want to save a new configuration, you will need to close the project and alter the positions, sizes and other properties of the components in the Delphi form designer. Don’t add or delete components, however. The existing configuration files can only be reloaded if the correct components are on the form. Now run the application. Enter a new name, such as new.dwf, into the combo box field. Then click ’Save Form’.
You might think that these simple techniques provide the complete answer to form saving and loading. Not so! The trouble with this code is that it saves all the components on the form but it does not save the form itself.
Try this. Run the saveform.dpr project. Enter the name bigform.dwf into the combo box. Drag the right hand corner of the form to make it bigger. Then click ’Save Form’. Drag the corner of the form to make it smaller. Then click ’Load Form’. The form stays the same size. The component configuration is saved and loaded. The form configuration is not.
Top Of The Form
At first it is not obvious how to save the properties of the form itself. A quick glance through the help section on the ‘VCL Overview’ provides a clue. This says "Visual components, such as TForm and TSpeedButton, are called controls and descend from TControl. Controls are used in GUI applications, and appear to the user at runtime". Of course! A form is a visual component, just like a button. And, being a component, it should be possible to save it to a file in the same way as you would save any other component.
Load up the saveform2beta.dpr project. This is my first attempt at saving a complete form component to disk. As you can see, this code is even simpler than the code in our previous project. Having created a file stream object, fs, I write the entire form object, Form1, to disk with this single statement:
fs.WriteComponent(Form1);
Reloading the form is almost as easy. This is all it takes:
fs.ReadComponent(Form1);
There is actually one other minor complication involved in reloading a form. When a form is saved to a file stream, it writes all its components to that stream too. When the form is reloaded, the form object itself is read in prior to the components. The form object has a Components property which contains an array of all the components owned by the form. When that property is read in, the names of the objects in the array duplicate the names of objects on the form, causing Delphi to display an error message.
To see what I mean, comment out the second line of code in the Button2Click() method, as follows:
{ ZapComponents; }
Now run the program and click the ’Load’ button. Uncomment that line and run then program once again. Now look at the ZapComponents() procedure. All this does is remove all the components from the Components array. It does not, however, destroy the components themselves.
Run the application again and verify that it does indeed save and load the form, all its properties and all the components on the form. Try this: in the edit field enter the text, ’Hello world’. Click the ’Set Caption’ button to place the text in the form’s caption. Move the form and resize it. Click ’Save’.
Enter the text, ’Goodbye’ and click ’Set Caption’. Move and resize the form once again. Now click ’Load’. This will reload and reconfigure the form, its components and all its properties including the caption and the text in the edit box. End of story? No, not quite. There is still a problem.
Try this. Close the application if it is still running. In Delphi’s form designer, move the buttons to new positions on the form. Run the program again and click ’Load’. You should see that you now how two versions of each of the buttons you moved.
In most applications, you would never notice this duplication. The components loaded from disk would simply overlap the components already on the form. However, we shall soon be programming an application that allows the user to make adjustments to the user interface while the application is still running. In this case, if copies of the controls were added every time the user loaded up a saved form configuration, the form would quickly be filled with a mess of duplicated buttons and fields.
Parental Control
Let’s see how we can do to fix this. Load up the saveform2.dpr project. This is a rewritten version of the last project which solves the problem of duplicated components. To try it out, run the application and click the ’Load’ button to read in a previously saved version of the form. As you can see, when the saved form is loaded, the ’Load’ button moves to a new position. And this application, unlike the previous one, does not leave behind a copy of the button in its previous location.
Take a look at what’s going on here. Shut down the application and turn to the code in the editor. The loading and saving routines are identical to those in the last project, saveform2beta.dpr. As in that project, you will see that the form-loading code in TForm1.Button2Click() is preceded by a procedure call to ZapComponents().
This is the code of the old version of that procedure in the saveform2beta.dpr project:
procedure TForm1.ZapComponents;

var

   i : integer;

begin

   for i := 0 to (ComponentCount - 1) do

      Form1.RemoveComponent(Components[0]);

end;
This iterates through the components on the form, removing the first item from Form1’s Components array property each time through the loop. By the time the loop finishes executing, the Components array is empty. This makes it possible to load up a saved form definition without encountering component name-clash errors. However, it does not remove the visual components from the form. Now look at the rewritten procedure in the saveform2.dpr project:
procedure TForm1.ZapComponents;

var

   i : integer;

begin

   for i := 0 to ComponentCount - 1 do

   begin

      TControl(Components[0]).Parent := nil;

      Form1.RemoveComponent(Components[0]);

   end;

end;
This also iterates through the form’s Components array. Each time through the loop the Parent property of the first component (Component[0]) is set to nil:
TControl(Components[0]).Parent := nil;
Previously the Parent of each component was Form1. When the Parent property is a form object, the component will appear on the form. When the Parent property is nil, the component no longer appears on the form. Notice that the component has been cast to the TControl type. This is due to the fact that some non-visual components do not have a Parent property so the code will not compile unless it is treated as a descendant of TControl.
Next this same component is removed from the form’s Components array just as it was in our previous project. When we remove the first component, the next component (the one previously at index 1) becomes the first component (at index 0) and it will therefore be processed at the next turn through the loop.
Class War
OK, so now that’s sorted out, we should be ready to put it into practice in a truly configurable program. Load and run the saveform3.dpr project. This contains four movable buttons, Button1 to Button4, plus a panel containing three ’fixed’ buttons.
Click Button1. It responds to a click by popping up a dialog box. Click it again but this time keep the left mouse button pressed down. Now you can drag the button around on the form. Next click and hold the left mouse button on the lower right-hand corner of Button1. Now you can drag that corner to resize the button.
The application also provides a popup menu to resize and align the buttons. Click the right mouse button over Button3. Select ’Make same Size’. Click the right mouse button over Button3 once again. This time select ’Align Left’.
By now, your form is probably quite a mess. Never mind, you can sort it out by reloading a previously saved version. Just click the ’Load Form’ button. This loads up all the components, without duplicating any of them, and it also resizes the form.
To see how this has been done, shut down the application and turn to the code. As you might expect, the saving and loading routines are fundamentally the same as in the previous project. There are a few refinements, however.
Notice that TForm1.SaveForm() and TForm1.LoadForm() are functions that each return a boolean value. The return value indicates whether or not our attempt to save or load a form has been successful.
This value is tested by the LoadBtnClick () and SaveBtnClick() methods as follows:
procedure TForm1.SaveBtnClick(Sender: TObject);

begin

   if not SaveForm(SAVEFILE) then

      ShowMessage( 'Error: Can''t save ' +  SAVEFILE );

end;
Here the method displays an error message if SaveForm() returns a false value. In most cases, any streaming errors will be handled automatically when the file stream is created. However, it’s always worth having en extra safety net.
The False value of the function Result variable is assigned inside a try..except block within the SaveForm() and LoadForm() functions. The ’except’ part only executes if an exception occurs when writing or reading a component. This block is nested inside a try..finally block to ensure that the TFileStream object is freed whether or not an exception occurs.
The other thing to notice is that the ZapComponents() procedure has been slightly rewritten. Originally I just copied the code from the saveform2.dpr project. However, in the present application, that code invariably resulted in an access violation whenever a form was loaded. This is the rewritten code:
procedure TForm1.ZapComponents;

var

   i : integer;

begin

   for i := 0 to ComponentCount - 1 do

   begin

     if TComponent(Components[0]) is TControl then

       TControl(Components[0]).Parent := nil;

     Form1.RemoveComponent(Components[0]);

   end;

end;
There is just one additional line here:
if TComponent(Components[0]) is TControl then
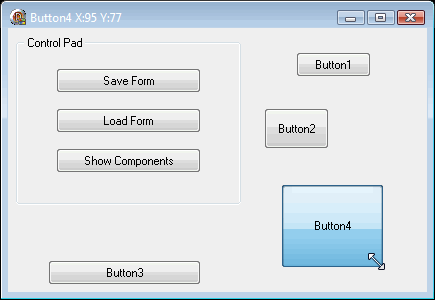
The final application lets you redesign a form at runtime by moving and sizing buttons using the mouse...
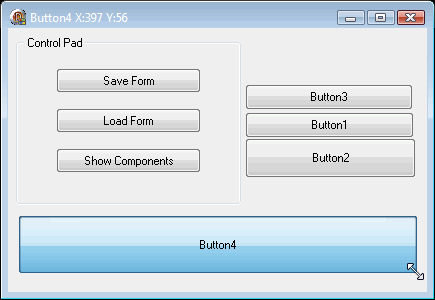
Here’s a design all ready to save to disk...
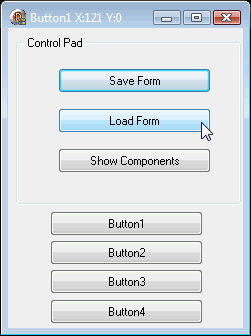
And, at the click of a button, I can also load up a previously saved design.
Remember I said earlier that non-visual controls may not have a Parent property. Well, I’d forgotten that I have just such a control in this application. It’s the popup menu. Descendants of TControl, such as TButton and TComboBox, do have a Parent property. But TMenu and TPopupMenu do not descend from TControl so they do not have a Parent property.
However, TMenu, TPopupMenu, TControl and all its descendants also descend from TComponent. I have therefore been able to cast every component to the TComponent class in order to test, using the ’is’ operator, whether they also belong to the TControl class. Only if that test evaluates to True is the Parent property set to nil.